Coif Construction
by David ClemonsThis document will assume that you
have some working knowledge of how to assemble mail. If you do not
know the mechanics of assembling mail, I suggest you read one of the
articles on mail construction.
The first thing to do is to assemble a strip of mail five rows
wide as pictured in Figure 1.
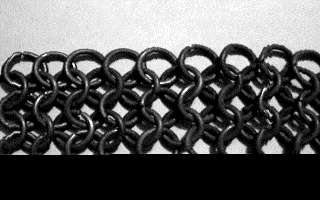
FIGURE
1
You want the length of this strip to be long
enough to fit comfortably around your head just above the eyebrows.
This will be the widest point in the upper portion of the coif. The
top of the coif begins with one ring at the top and will expand
gradually to match up with the piece you have already made. Let me
give an example of a coif I constructed using 16 gauge galvanized
steel wire with an inside diameter of 5/16". The center ring has 12
rings connected to it. Figure 2 shows how this would look although
the number of rings in the shown coif is different (use your
imagination).
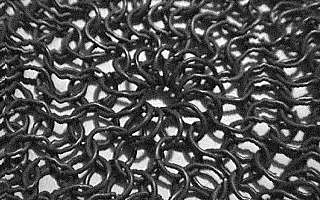
FIGURE
2
For reference we will call this row 1. Row 2 is
attached to row 1 just as normal mail is constructed and also
consists of 12 rings. Row 3 consists of 18 rings. Assemble 12 rings
as you did in row 2, then go back and add an extra ring every 2
rings as shown in Figure 3.
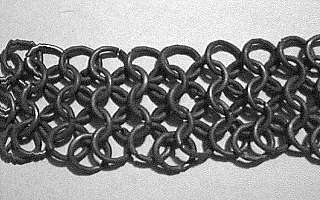
FIGURE
3
Rows 4 and 5 are constructed the same way as row 3
(expanded every 2 rings). Rows 6 and 7 are constructed normally(no
expansion). Row 8 is expanded by adding an extra ring every 3 rings.
At this point I reached the number of rings that were in the first
strip that I created. If you have not, then figure out how many more
you need to add and distribute them evenly in row 9. I found that I
had to add 6 more rows (no expansion) so I could attach the first
strip and have it positioned just above my eyebrows for a total of
20 rows (9 + 6 + 5 = 20, not including center ring).
Now posistion the piece you have on your head and look in a
mirror (don't laugh too hard or you'll never finish). Count the
number of rings in row 20 that are positioned above your face (in my
example it was 14). Subtract this number from the total in row 20 to
give you the length (in rings) to assemble the part from row 20 to
your neck line. For me it took 22 more rows. Now attach this sheet
(in my example: 22 rows long X ((Total row 20)-14 rings)) to the top
portion you have assembled already.
What you have now is normally referred to as a common coif. If
you wish to complete it into a full coif then you must contruct a
mantle to attach to it. To do this, contruct a strip of mail 5 rows
wide and as long as the sheet you added to the top portion (ie,
(Total row 20)-14 rings), plus a little more than the face are (14
in my case, remember). I chose 17 for mine. Next do another strip of
5 rows and attach it to the first strip expanding 1 ring for every 3
rings. I added two more rows of 5 this way, but if you want it to
extend out farther you could add another. In summary my mantle
portion consists of 3 strips of 5 rows(15 rows total) and the 2
connecting rows (expansion rows) for a total of 17 rows. Now attach
this mantle to your common coif using a non-expanding row and you
now have a complete coif as shown in Figures 4 and 5.

FIGURE 4
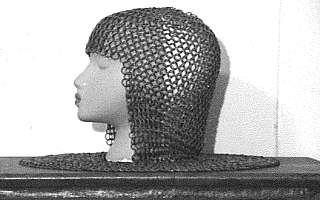
FIGURE
5
|