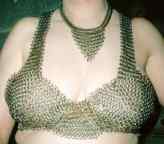
Bra pattern for larger women
Pattern by :Karl
This pattern took me months to figure out. But all the time spent was well worth the effort! Especially when I saw Kate's face when she finally got to try the finished article on.
The bra is made out of 10 mm o/d (outside diameter) rings made from 1.5 mm diameter wire. The metal is nickle plated mild steel.
So how did I make it?
(a) Make two cups using the method shown on this page :
Mail CoifHCP Helps Design Chainmail HeadgearNote : This is not my work but a reconstruction from a printed copy of the page that used to be at www.mich.com/~rmenard/cmail.htm How do you design chain mail so that it fits on
your head?
Every other row is 6 links larger than the preceding row.
Rings one and two -top left and
center Ring three - top right Add two links to every link of row two Join every pair (18 links needed).
|
I used this pattern as you end up with a hexagonal cup and having straight lines to work with at the edges made the rest so much easier. Keep expanding and fitting the cups until the woman is happy with the coverage.
(b) Join the two cups using a standard 4-in-1 triangle. (first place that the straight edges came in handy!
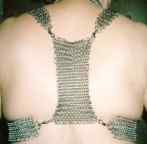
(c) The size of the shoulder straps will depend on how large the woman's breasts are. The straps start off as wide as the "straight edge" then I reduced them one ring every 3 rows until they were ten rings wide. The chest straps were done in the same way.
(d) The back "strap" is a standard piece of 4-in-1 maille. It was made so that it fitted comfortably between the shoulder blades, no matter how the arms were moved
(e) The final step is the fitting of the garment. This is where expanded rows are added to the "armpit" sides of the cup to give the woman the level of coverage she is comfortable with.
I know that this is not a detailed row by row pattern, but given the diversity of what you will be working with, no such pattern exists! But given these basic instructions and ten to twenty hours of knitting & fitting, you should end up with a product you are happy with.
If anyone does find this pattern useful, or need further help, then e-mail me and I will do all that I can. If you live in Melbourne Australia and want one made then you are looking at approximately $450.


